Getting OOBM with ER805
Managing network devices remotely is essential for maintaining uptime and reducing operational costs. However, what happens when you lose IP connectivity to a device behind your router? Traditionally, you would need to travel to the site and connect via the console port—a time-consuming and costly process. Fortunately, the InHand ER805 router offers an Out-of-Band Management (OOBM) feature that solves this problem.
What is Out-of-Band Access?
Out-of-Band (OOB) access is a management mechanism that uses a dedicated connection separate from the production network. This ensures that even if the primary network fails, you can still manage and troubleshoot devices remotely.
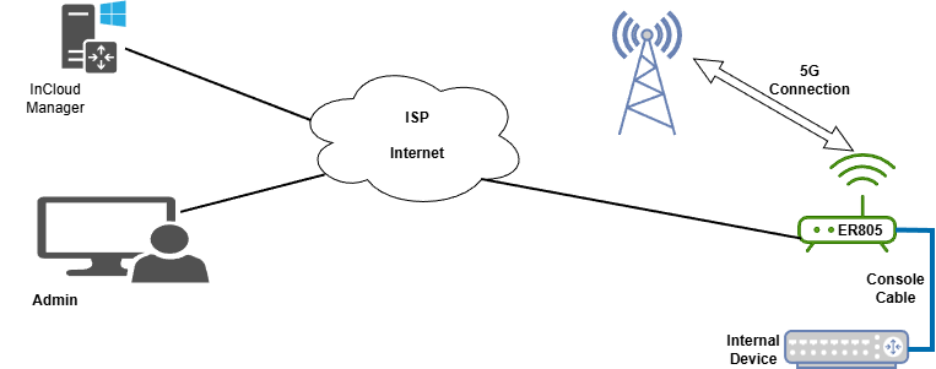
The ER805 router supports dual connectivity:
Primary Internet Line
5G SIM Card for Cellular Backup
This redundancy ensures continuous Internet access for management purposes.
Scenario
Imagine you lose IP connectivity to a device behind the ER805 router. Instead of traveling onsite, you can use the ER805’s OOB feature to access the device’s console remotely via InCloud Manager.
How It Works
By connecting your device’s console port to the ER805’s serial/USB port, you create a pathway for remote console access. The ER805 acts as a bridge between your remote terminal and the device’s console. Refer to the picture below.
Step-by-Step Guide to Remote Console Access
Login to InCloud Manager
Use your credentials to access the cloud management platform.
Open the ER805 Device
From the list of devices you have, select the ER805 of your concern.
Go to the Clients Tab
This tab exposes the OOBM button
Click on the OOBM Button
This opens the Out-of-Band Management configuration window.
Configure Tunnel Settings
In the pop-up window:
Select Tunnel Protocol: COM or TCP
Fill in the details according to your device’s specifications.
Example for a Cisco device:
Baud Rate: 9600
Data Bits: 8
Stop Bits: 1
Parity: None
Create the Tunnel
Click Create Tunnel to establish the connection.
Access the Device
Use the provided address and port to connect via Telnet or SSH from your preferred terminal.
Example using PuTTY:
Enter the IP and port.
<ol style="margin: 0px; padding: 0px; cursor: text; list-style-type: lower-roman; overflow: visible" start="2" class="x_43649489NumberListStyle3 x_43649489SCXW169298656 x